 You should complete a comprehensive swamp cooler startup checklist every spring before the first major heatwave hits to ensure peak cooling performance and prevent costly water damage, especially for homes in Grand Junction and across Mesa County.
Skipping these maintenance steps leads to common evaporative cooler cooling problems, such as stale air, low airflow, and hidden roof leaks. A proper startup routine includes cleaning the pan, replacing pads and belts, inspecting the water pump, and verifying the water supply line is completely sealed.
Why Is Cleaning the Pan and Uncovering the Unit Your First Step?
Uncovering the unit and cleaning the bottom water pan is crucial because any leftover winter debris or protective canvas covers will completely choke the system’s airflow. If you leave a winter weather cover on the exterior cabinet and turn on the fan, the motor will instantly overheat trying to pull air through the solid fabric block. Once the cover is safely removed and stored, you must address the debris that settled in the pan.
Scrubbing the basin clean before adding fresh water prevents severe cooling problems caused by stagnant organic matter. Over the winter, small amounts of moisture combine with dirt to create a breeding ground for bacteria, mold, and algae. If you do not rinse this sludge down the drain line before starting the pump, your entire home will quickly fill with a swampy, musty odor that is incredibly difficult to eliminate once it enters the ductwork.
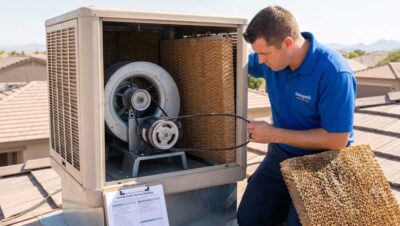
How Does Replacing Pads and Belts Improve Airflow and Efficiency?
Replacing cooling pads and fan belts every spring directly increases the cooling capacity of your unit while lowering your monthly utility bills. Cooling pads serve as the engine of the entire evaporative process. When these pads become clogged with hard water mineral scaling, air cannot pass through them efficiently, which dramatically drops the humidity-to-cooling conversion rate.
Consider how the condition of your pads and belts changes your system’s performance:
- Aspen Wood Pads: These traditional fiber pads degrade quickly and thin out over a single season. New pads ensure even water distribution across the entire surface area.
- Rigid Cellulose Media: These thick blocks last longer than wood fibers, but they must be checked for mineral crusting that blocks the small internal air channels.
- Drive Belt Tension: A worn, cracked, or sagging belt slips on the motor pulley. This slippage drops the fan blade rotation speed, resulting in weak airflow inside your rooms.
Insider Belt Tension Rule: Press down firmly on the center of the belt between the two pulleys. A perfectly adjusted belt should deflect downward between one-half inch and three-quarters of an inch. If it sags lower, the belt will slip, screech, and quickly wear down the motor bearings. If it is too tight, it will pull the fan shaft out of alignment.
What Common Pitfalls Cause Destructive Swamp Cooler Leaks?
The most common causes of swamp cooler leaks include rusted overflow drains, cracked copper or plastic water supply lines, and misaligned float valves inside the pan. Because these cooling units sit on roofs or high exterior walls, a minor water leak can quickly soak through your roof decking, ruin ceiling drywall, and rot structural rafters before you spot the drip inside your living space.
To prevent structural water damage, verify these three critical areas are fully sound:
- The Supply Line Connection: Inspect the small plastic or copper line connecting your home’s main water valve to the cooler. Winter freezing often splits these thin lines, causing a high-pressure spray the moment you turn the water back on.
- Float Valve Calibration: If the float ball is set too high, the water level will rise past the top of the overflow pipe, dumping hundreds of gallons of water across your roof surface continuously.
- The Drain Plug Seal: Ensure the plastic or brass drain fitting at the bottom of the pan is screwed in tightly with fresh plumber’s tape or a healthy rubber gasket to stop slow, constant dripping.
How Do You Inspect the Water Pump and Distribution System?
Inspecting the water pump and the overhead distribution tubes ensures that water actually reaches the cooling media rather than pooling uselessly on one side of the cabinet. The water pump is a small electric motor that sits in the lowest point of the basin. If mineral scaling builds up around its intake screen, the pump will run dry, overheat, and burn out within a matter of hours.
After cleaning the pump screen, trace the small water lines that lead up to the distribution spider or drip tray above the pads. Hard water minerals frequently plug the tiny weep holes in these tubes. When holes clog, parts of your cooling pads stay bone dry. Hot outdoor air will slide right through these dry patches without losing any heat, resulting in weak cooling performance inside the home.
Solving Common Evaporative Cooler Cooling Problems
If your system runs but fails to lower the indoor temperature effectively, you are likely dealing with improper water saturation or incorrect indoor ventilation. Evaporative cooling relies on a precise balance of water flow and home airflow. Unlike traditional air conditioners that require closed doors and windows, a swamp cooler demands that you crack open windows in the rooms you want to cool.
To eliminate performance drops, systematic checking is required:
- The Air Balancing Act: If windows are closed tightly, the cooler cannot push fresh air into the home because of high internal air pressure. Open windows roughly two inches in active living areas.
- Inadequate Pump Pressure: If the pump is weak, it cannot push enough water to keep the pads thoroughly soaked during the driest, hottest hours of the afternoon.
- Incorrect Pad Material Density: Packing too much wood fiber into a pad frame suffocates the blower fan, while leaving large gaps allows hot, dry air to enter the home completely uncooled.
Can You Start Up a Swamp Cooler Yourself?
You can complete a swamp cooler startup yourself if you are comfortable climbing ladders and handling basic plumbing tools, but rooftop units are often best left to professionals. Working on a slippery, angled roof while handling wet components presents real safety risks. Furthermore, diagnosing complex electrical issues with a multi-speed blower motor requires specialized testing meters.
If you attempt a DIY startup and misjudge the belt alignment or over-tighten a brass fitting, you run the risk of breaking components or triggering an active roof leak. Professional technicians carry onboard replacement parts, high-grade sealing compounds, and specialized alignment tools. They can identify hairline cracks in a water pan or a failing motor capacitor long before those issues turn into a mid-summer emergency for homeowners in Fruita or Palisade.
Technical Maintenance Steps for Longevity
To truly protect your cooling asset, your checklist should extend to the electrical connections and mechanical bearings. Neglecting these areas creates hidden drag on the motor, which shortens its lifespan and increases your power draw.
- Lubricating the Bearings: Most traditional cooler designs feature oil ports on the blower shaft bearings. Adding a few drops of dedicated zoom spout oil prevents friction from locking up the fan blade assembly.
- Inspecting Electrical Wiring: Inspect the insulation on all internal wires. The extreme heat of summer, followed by winter freezing, can crack the plastic coating, leaving raw wires exposed to the humid internal environment.
- Cleaning the Motor Housing: Use a dry brush or compressed air to blow out dust from the motor vents. Clean housing allows the motor to shed heat quickly during extreme operations.
The Financial Impact of Proper Spring Startups
An evaporative cooler that receives proper care every spring will easily last up to fifteen years, whereas a neglected unit often rusts out and destroys its own motor in less than five. The combination of water, oxygen, and metal creates an ideal environment for rust. Applying a fresh layer of marine-grade cooler coating to the interior pan every few seasons keeps corrosion from eating through the steel sheet metal.
Investing a few hours into preventative maintenance before the summer heat hits pays massive dividends in reliability, indoor air quality, and peace of mind. Keeping the mechanical components lubricated and the water paths clear ensures your home stays crisp, cool, and comfortable through every heatwave, including homes in the Redlands where rooftop exposure can be intense.
Frequently Asked Questions
Why does my swamp cooler smell bad when I first turn it on?
A musty smell means stagnant water, algae, or mold accumulated in the bottom pan over winter. Scrubbing the basin and running fresh water through the lines before starting the fan will clear the odor.
How often should I change my swamp cooler pads?
You should replace the aspen wood fiber pads at the start of every spring season. Rigid cellulose media pads can last three to five years but require annual descaling to remove hard water deposits.
Why is my swamp cooler leaking water onto my roof?
Water leaks are usually caused by a cracked water supply line, a rusted drain plug, or a float valve that is adjusted too high, which causes water to overflow out of the safety standpipe.
Prevent hidden roof leaks and ensure optimal summer comfort by addressing your system early. Kokopelli Home Services provides expert swamp cooler startup and maintenance to keep your home cool and safe throughout Grand Junction, Mesa County, Fruita, Palisade, and the Redlands. Contact us today to book your professional spring tune-up.